Inverse split tunneling with Gluetun


Ever wanted to be able to use VPN without having to run VPN malware software on your PC? Maybe you only want to use VPN for web browser and disable it for everything else by default? I wanted this exact thing which lead me to writing this article.
Why getting rid of VPN client?
Let's go through some idiocratic cases I had honor to be involved in.
1) Certain applications don't do well when routed through VPN. Like games, for instance. One time, unbeknownst to me, I had my Mullvad VPN client running when I decided to play some Counter-Strike. Because of this an in-game matchmaking decided to send me over to a Hong-Kong server with 100 ms delay (aka ping) which made it borderline impossible to aim at my enemies. Having no other choice, I was forced to shoot my non-friendly chinese teammates to have at least some fun. Needless to say, they weren't happy with my performance:
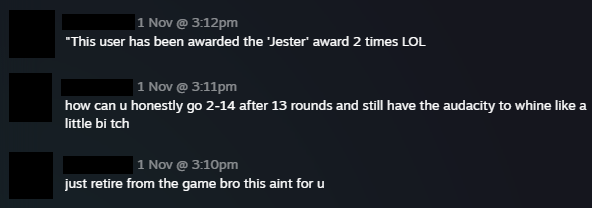
Rather strange that I ended up in China because my VPN location was set to Melbourne CBD, so why did Gaben decide to throw me all the way to Hong-Kong is a mystery. But hey, the apparent root cause was a weird interaction between the game and my VPN client. Everything else is irrelevant.
You may say: "Just add Counter-Strike to a split tunneling list on your VPN client, dumbass!". You'll might be right, especially the "dumbass" part. But what if I have 100 other apps that, for whatever reason, I don't want to run through VPN? Add all of them to split tunneling? When all I want is to be able to web-browse through VPN without using the bloody thing for anything else? A hundred-entries-long exclusion list when I'm only VPNing through one app? God forbid.
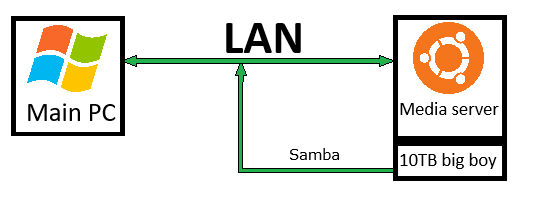
2) Local network sharing might be affected by VPN. Speaking of a dumbass, let me give you another story taken from my VPN adventures. I have a media server as a separate machine which runs Ubuntu and has it's own storage (10TB HDD, a big boy). I wanted that storage to be accessible on my main Windows PC, so I went with a good old Samba. It's a Linux utility that makes your storage drive accessible to your LAN machines:
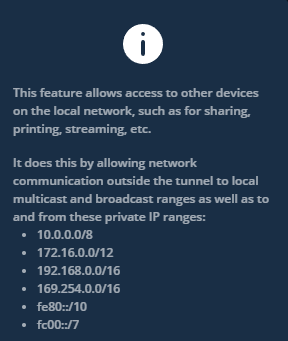
Why am I telling you all this? When setting up Samba for the first time, unable to get it to work after three hours of pain, I began cursing this Samba thing and whoever made it and almost started questioning my own sanity. Suddenly it crossed my mind that my VPN client (I totally forgot the bloody thing was even running!) might be involved in this circular jerk because Samba is communicating over network, and VPN is like a network-related thing right? Inspired by the brilliance of my discovery, I went on to check VPN settings. And indeed I saw an option called "Local network sharing" which apparently permits data exchange over LAN outside the tunnel. You guessed it right: stupid thing was disabled by default effectively blocking file exchange between my machines!

There goes 3 hours of my time which I could have spent writing an incredibly useful article like the one you're reading right now. Anyway, after enabling this magical feature my Samba setup suddenly came to life.
You may say: "You enabled this option now, so it won't trouble you in future. What's all the fuss about? DUMBASS!". Yes I did, and yes it won't. But to put so much effort into something as simple as local file sharing while being cock-blocked by VPN client the whole time... made me question if it's really worth it.
Again, why would we want to get rid of VPN client app?
TLDR:
- certain applications might be acting in an unpredictable manner when tunneled through VPN (can be fixed with split tunneling);
- split tunneling is a pain in the arse if you only want to use VPN for one or two applications and not the rest of your system;
- VPN client might have local fire share disabled by default causing unpredictable LAN-related issues if left unnoticed;
- I like to reduce the amount of
bloatwarethird-party services running on my machine. So if I can get rid of it while preserving its functionality - why not?
Maybe you haven't dealt with any of these issues because your VPN client app is more advanced and flexible, but I can't share your happiness. I use Mullvad which is one of the most trustworthy providers out there. Unfortunately their app is lackluster. Not terrible, but far from perfect. And most importantly, no one can stop me from messing around and reinventing the wheel.
So how do we delete VPN client from our computer while still being able to access VPN tunnel from your provider (that we potentially paid for)? Where do we even start? Let's dive into technical details.
What is inverse split tunneling?
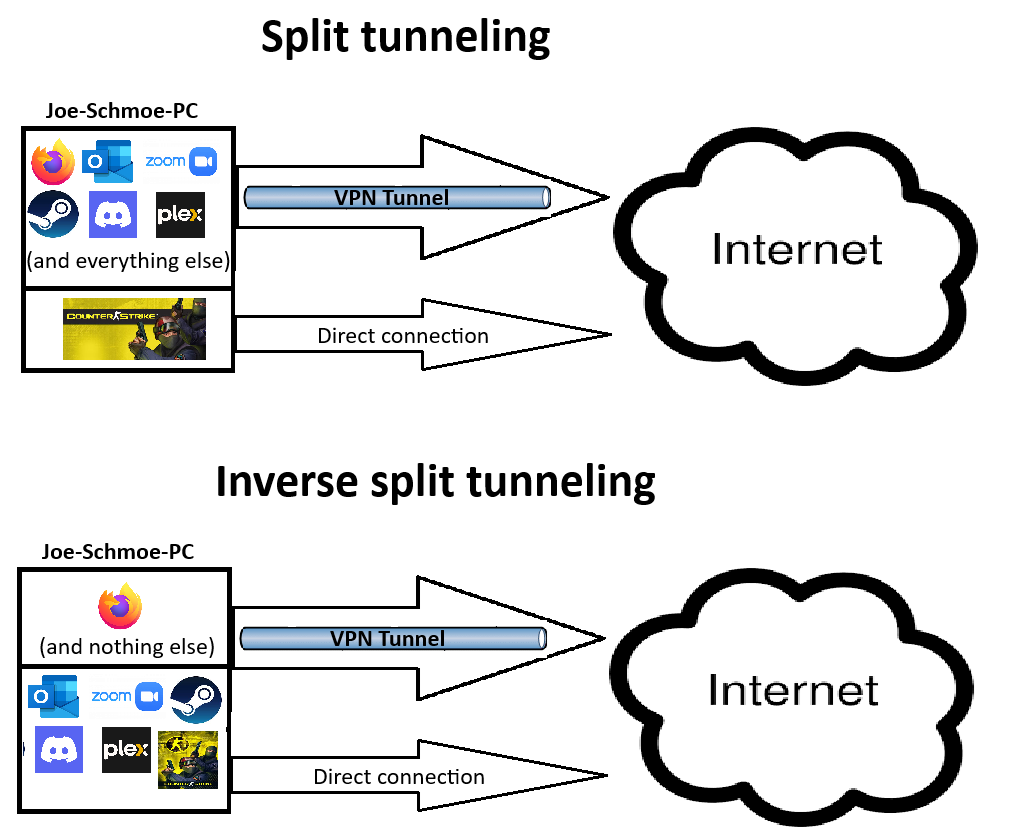
Inverse split tunneling is not a widely-used term. There's plenty of information about traditional split tunneling online, but not so much about its inverse counterpart. Simply put, inverse split tunneling lets users choose which services will use the VPN tunnel, rather than which will bypass it. In contrast, traditional split tunneling lets users choose which services bypass the VPN tunnel, rather than which will use it. See the difference? See how this applies to the situation I described above with only wanting to run a single app (web-browser) through the tunnel?
Not ringing any bells? Look at the picture then:
Unfortunately this extremely useful feature is missing from Mullvad VPN client despite requests from multiple users. And it doesn't look like it will be added in the near future. As of now, all I can do is add all the apps I do not want to be tunneled through VPN to a split tunneling exclusion list. But as we discussed above, this approach is unacceptable for me.

So how do we implement this very crucial (and very inverse) functionality that is missing from official client app? The answer is Gluetun.
What is Gluetun?
Gluetun is a docker container that allows accessing VPN tunnel without running VPN client on host. All your VPN features, including data encryption and masking of IP address and location, will be applied to everything sent through container. I describe Gluetun as something completely opposite to traditional VPN clients, while in reality Gluetun is also a VPN client, but much more flexible in terms of configuration, and more importantly, completely isolated from your host system (except for network interface, but more on that later).
More Paint:
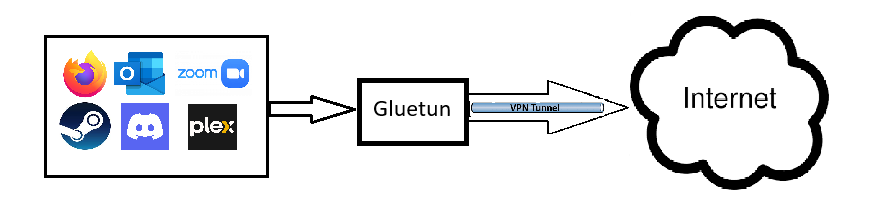
Very roughly speaking (please don't throw rocks at me), Gluetun acts as a network interface for applications. Instead of exchanging data through normal network interface, like they usually would, apps send and receive packets through an instance of Gluetun, and thus achieve VPN functionality of encryption and anonymity.
One might notice that this network setup is similar to what VPN client app performs. When you launch your VPN client it creates a virtual network interface that acts as a substitution (or intermediate?) to your usual Ethernet or Wifi network interface. Remember, we're not talking about physical network interfaces (because they can't be modified by VPN or any other software, right?), but rather virtual ones.

So what about Gluetun? We'll attempt to achieve what VPN client does using Gluetun container. This will help with our inverse split tunneling thing, plus we'll be able to get rid of VPN client app.
Not bored to death yet? Does not seem totally pointless? You must be an interesting individual. Next chapter is for you.
The easiest way of using Gluetun and why it won't work for me
"Finally something practical!" - a reader might say. As I mentioned at the beginning, a simple man like me only needs VPN to for anonymity when browsing online. Anonymity in this case means data encryption (your ISP doesn't know what kind of traffic you exchange with what websites) as well as obscuring the IP address so websites don't know who I am or where I am.
Now, how do we make web browser use VPN tunnel without running VPN client on the host? Considering what we just learned about Gluetun, the dumbest, most straightforward scheme would look like this:

This can be done very easily if you run Firefox in docker. Actually, this is the most common way of using Gluetun: we put both Gluetun and Firefox (or any other app that needs to be routed through Gluetun) in the same compose file. Such a structure is called "sidecar container": Gluetun is a sidecar container for the main Firefox container. That way Firefox will be forced to use Gluetun's network interface for Internet access without having a clue about any other network-related setups of your host system - full virtualization! No additional configuration required on Firefox side which makes it a really elegant solution. If you're on Linux and running your apps in docker - this is all you need for a seamless Gluetun experience.
Why does it not work for me?
Unfortunately (as always), this is not my case. A careful reader might remember that my main machine is Windows, and this is where I like to use my browser. But Gluetun container is running on a separate Linux machine (aka server) which won't let me set it up the way I described above.
Same reader might say: "Just move them both to the same machine, dumbass!". Let me explain this peculiar moment before you start questioning my sanity. If I wanted to run both Firefox and Gluetun on the same machine (and same compose file) I would have to do one of the following:
- Move Firefox to my server Linux machine. I didn't take this approach because I access my server via Remote Desktop Connection since it doesn't have its own monitor. Running things through RDP does not provide a very smooth experience, especially when actively using UI applications. On top of that my server is much slower than my main machine, which is hardly a surprise since I only spent close to $200 on its components all up. All these factors make browsing through RDP a below average experience to say the least. I don't mind below average experience when I play Counter-Strike because I'm used to people in-game calling me "fat f**k". But when it comes to web browsing I want everything to be 100%. And let's just think about it: connecting to remote machine in order to access web browser that's running inside docker container just to check an email? If that's not convoluted then I'm not tilted.
- Move Gluetun to my main Windows machine. Despite docker being purely a Linux thing by design, we can still run docker on Windows. So why not? I've read some mixed reviews from poor bastards who decided to take this route, and that pushed me away. It seems to be okay for development, but running real applications that way? Meh. On top of that I wanted an authentic Linux experience when it comes to docker so I said "no" to docker on Windows. However, if this idea seems appealing to you, I do encourage you to try this trick yourself. And if it turns out to be a seamless user-friendly setup then definitely get back to me and call me an incompetent idiot.
Now we established that I can't run both Gluetun and Firefox on the same physical host. How to do it then? This leads us to our next section.
Configuring HTTP proxy server on Gluetun
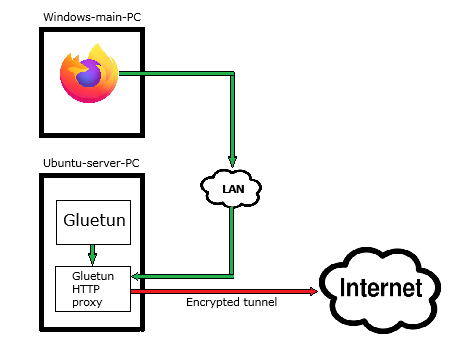
Turns out Gluetun has this useful feature called HTTP proxy which will basically create a proxy server acting as an access point for apps that need to be routed through VPN. This proxy can be accessed by other machines in the same LAN. This will be my cheap downgraded replacement for a virtual network interface that VPN client normally creates.
With that in mind let's modify the picture above in order to reflect my actual setup:
Luckily, Firefox provides ways to use this very functionality. But before we start with browser settings let's find out how to configure Gluetun HTTP proxy.
Prerequisites
1) Current VPN subscription. I use Mullvad for €5 / month. It has a good reputation for its no-logging policy and is easily supported by Gluetun.
Note: it's also possible to run Gluetun if you have your own VPN server that's running Wireguard or OpenVPN. The configuration might be slightly different, but the principle is the same.
2) Linux machine with docker installed. This machine will be used to run Gluetun. Don't have docker installed? Easy installation guide. Don't have a Linux machine? Stop reading this article and get yourself Ubuntu.
Once you're done with prerequisites, copy and paste Docker Compose file easily obtainable from my github and put it into a separate folder. Or just clone the whole repo:
git clone https://github.com/fulltiltembedded/gluetun_http_proxyThis compose.yaml contains all the configuration required for HTTP proxy. Let's explain what's going on in every section of this file and what needs to be modified for everything to run smoothly on your machine.
Common config
    cap_add:
      - NET_ADMIN
    devices:
      - /dev/net/tun:/dev/net/tun
Gluetun container requires access to /dev/net/tun to be able to create a tunnel. In order to access that device it either needs to have a root priviledge (never a good idea) or run with CAP_NET_ADMIN capability. I don't like running containers as root so we'll take the capabilities route. These things are pretty standard for every container that manipulates network interfaces, Gluetun isn't pulling anything weird here.
VPN config
Next section of our compose file, called environment, starts with VPN-specific settings. This is probably the most challenging part of our config because we'll be dealing with nitty-gritty internals of whatever VPN you're using. If you're with Mullvad like I recommended then it's going to be a breeze:
  environment:
    - VPN_SERVICE_PROVIDER=mullvad
    - VPN_TYPE=wireguard
    - WIREGUARD_PRIVATE_KEY=[wireguard_private_key]
    - WIREGUARD_ADDRESSES=[wireguard_addresses]
How to obtain private Wireguard key and addresses? I used this great tutorial from gluetun-wiki. They even show you step-by-step how to pull all the necessary data from Mullvad website menu.
Location config
Next interesting variable is SERVER_CITIES:
- SERVER_CITIES=[server_city]The power of this optional variable is that you can set it to any city where your VPN provider has exit point:
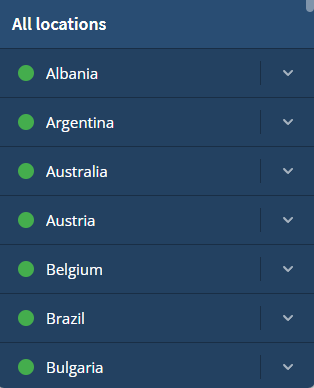
You can generate Wireguard key for an exit point physically located in Perth,WA (Mullvad provides location selection when generating a new key), then set your location to be Paris, France by using SERVER_CITIES. Let's recap:
- websites will think you're in Paris,
- while you're tunneling through Perth exit point,
- all while you're sitting on your bum drinking beer in Gold Coast.
Don't leave this variable unset because your location will be everywhere which will mess up your Google search results. For instance, take a look at these screenshots made at the bottom of the page. I used two identical Gluetun configs with only difference being a SERVER_CITIES value:


Pay attention to a second screenshot. Google thinks I'm in Illinois because SERVER_CITIES is unset. An offtopic question is why are we seing Illinois when my exit point is located in Perth, WA? It would make sense to see "Perth" on both screenshots even with "cities" unset. Well, that's another great mystery, and I suspect it has to do with how routing works inside Mullvad network. Sometimes it's Illinois, sometimes it's Paris, sometimes it's Turkey. To rephrase a famous song: "packets fall in Mullvad in mysterious ways, maybe just the touch of a Gluetun".
You can also use SERVER_COUNTRIES which apparently has a similar behaviour.
Timezone config
Pretty easy:
- TZ=Australia/CanberraChange that to whatever timezone you prefer.
HTTP proxy config
Finally we're getting to something substantial. I thought I won't make it all the way here and go back to drinking beer and playing CS2. And if you're still reading this you must be one stubborn individual.
Let's move on to next part of our compose.yaml adventure:
- HTTPPROXY=on
- HTTPPROXY_USER=[make_up_your_username]
- HTTPPROXY_PASSWORD=[make_up_your_password]
- HTTPPROXY_LOG=on
- HTTPPROXY_LISTENING_ADDRESS=:8080  # network port
This is how we enable HTTP proxy server in Gluetun. Make up your username and password and you're all set. For listening address (aka network port) we'll use a default HTTP port which is 8080. Keep in mind that this is the port inside your container. It has nothing to do with port number 8080 on your host machine.
We're done with proxy settings.
DNS server config
For a while I was happy with Gluetun thinking how I managed to get rid of VPN client (that was constantly running on my computer) and how I outsmarted everybody. It wasn't until I stumbled upon connection check page on Mullvad website that I realised something wasn't right:

To say I was surprised would be understatement. And while WebRTC leak was an easy fix, leaking DNS servers turned out to be a bigger problem than I expected. That's when I found out about DNS leaks:
A DNS leak is a security flaw that allows DNS requests to be revealed to internet service provider DNS servers, despite the use of a VPN service to attempt to conceal them.
That means that despite having an encrypted connection on your end, your ISP is still capable of knowing what websites you are visiting. As well as websites you visit being capable of identifying your real DNS address.
I had no clue my encrypted connection through Gluetun would leak any DNS data to my ISP or other websites. Funny enough, none of that was happening when I fired up my Mullvad VPN client, which at that time I haven't been using for several months:

Not wanting to go back to running VPN app 24/7, and frankly, still being slightly shocked by my amazing Gluetun setup not working correctly like I thought it was, I started looking for potential solutions.
Turns out Mullvad offers support for something called DNS over HTTPS that by default is enabled in their client app (hence no leaks in connection check). And lucky for me, Gluetun offers great support for this feature. Back to compose.yaml now.
First thing to do is set upstream DNS resolver to 'doh' which means DNS over HTTPS . You can use 'dot' (DNS over TLS), but do some googling because I have no clue how it's different from HTTPS one. More options here.
- DNS_UPSTREAM_RESOLVER_TYPE=doh Second (and last) step for preventing DNS leaks would be using DNS server from your VPN network:
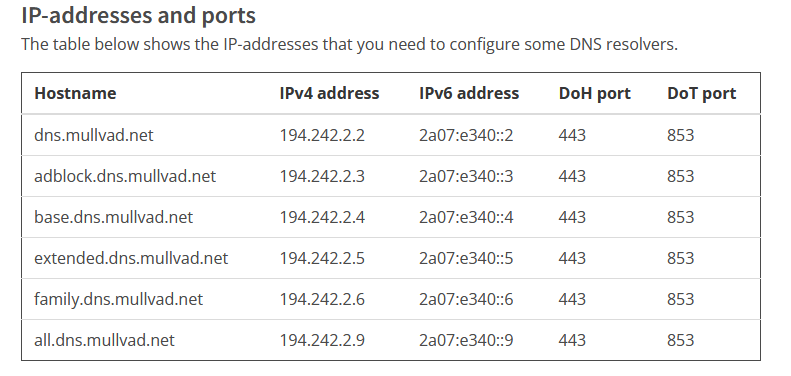
- DNS_ADDRESS=[dns_resolver_address] DNS_ADDRESS contains preferred DNS server IP address.
Pretty easy to do with Mullvad which provides multiple options to choose from. Pick whatever DNS you prefer and use its IPv4 as a value for DNS_ADDRESS:
If you're not with Mullvad, check your VPN provider website or contact their support to see if they can give you an IP address for one of their DNS servers. If no luck and DNS leak problem is bothering you, then find some trustwrothy third-party DNS provider and see if that improves your situation.
Quite an easy fix for such a complex problem, agree?
Port config
Port mapping is a final section of our compose.yaml. We need to map network port on our host to a port in the container. Very straightforward:
ports:
  - 8080:8080
Maps 8080 port on host to 8080 port in container.
It's always a good practice to verify that our host port is not in use by something else in the system prior to creating container. Easy to do with netstat:
sudo netstat -ntlp | grep 8080Should be run before creating container.
Port 8080 is free to use if this does not produce any output. But take a look what it shows on my machine:

In this example my 8080 port is busy (aka LISTEN) because it's already in use by a running instance of Gluetun. If you received an output similar to a screenshot above means port is busy and can't be used for Gluetun. In this unlikely scenario you can try other ports from the list. Make sure you run netstat before using any network port in your container to avoid potential headache! And if you do end up using a port different from 8080, your ports section should be modified accordingly:
ports:
  - [your_selected_port]:8080
And like this, we're done with proxy server settings.
Creating a container
Our hard days are through. All that's left to do is create a container - and our HTTP proxy server is up and running! In your terminal navigate to folder containing your compose.yaml and fire up docker compose:
docker compose up -dVerify it has been created successfully by running:
docker ps -aI also recommend ctop for monitoring docker containers.
It's also a good idea to run netstat again to verify that 8080 port on your host (or whatever port number you used) is actually in use by Gluetun. See previous section on how to do that.
Let's configure our web browser and get it over with.
Browser configuration
Proxy
Now with some extra steps we'll be able to browse online with our proxy server providing all security benefits of VPN. As I mentioned before, most modern browsers offer support for custom HTTP proxy. I'm using Firefox, but this won't be very different for any other browser. Look up "proxy" in settings and you'll see something like this:
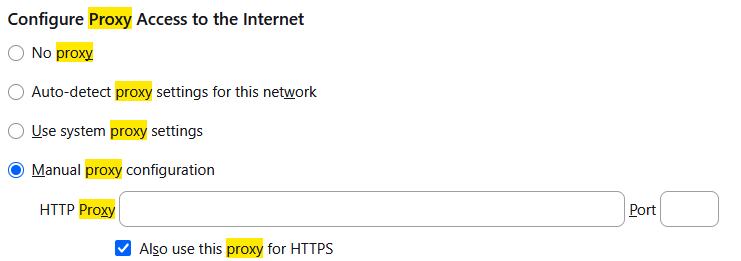
Select "manual proxy" option. You'll need to provide local IP address of your Linux machine (because this is where Gluetun is running) along with network port used for HTTP proxy which in our case is 8080. Run this command on your Linux machine to find out your local IP address:
hostname -I
You'll most likely see something like 192.168.x.x, or maybe an address from other LAN subnets. If that doesn't work don't give up:
ip addrLook for network interface named 'eno1' or 'eth0' or a similar stupid identifier:
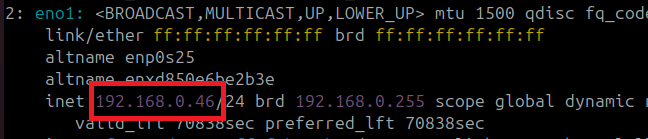
Now use that goddamn thing in your browser proxy settings:

DNS over HTTPS
Most browsers offer built-in DoH support, but we can turn it off because our Gluetun proxy provides it automatically with no extra actions required from a browser:
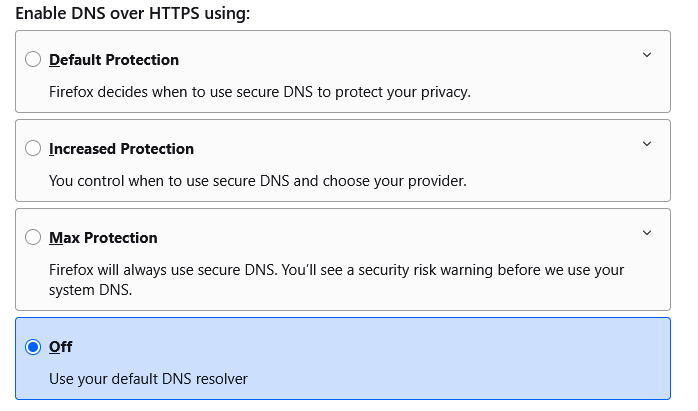
You can keep it enabled just in case you decide not to use your Gluetun proxy in future: this will force your browser to automatically switch to built-in DoH functionality. You browser DoH settings won't do anything while you're using Gluetun proxy so might as well turn them off.
Sign in
Restart your browser and try to access any website. This should pop up:
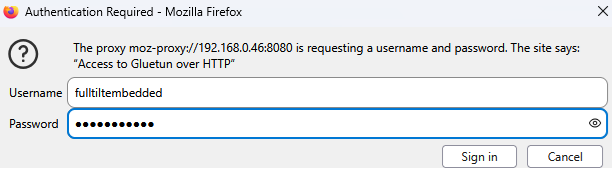
Enter whatever credentials you put in your compose file, and voila! Your Gluetun HTTP proxy is up and running! Also, there's a handy tool for managing proxy credentials on Firefox.
Is it healthy?
Last step is to verify your Gluetun HTTP proxy (preudo-VPN-tunnel) is working correctly. Head over to browserleaks.com and make sure your public IP address is not the same as your usual IP assigned by your ISP. Your location should also match your SERVER_CITIES value:

Don't know your usual IP? Disable proxy and refresh browserleaks page, or visit myip.com. I recommend you find this out so you can compare your normal public IP to your tunnelled IP address when accessing through proxy. Again, these should not match!
As for DNS leaks, browserleaks showed no leaking data, but I decided to double check with Mullvad's connection checker which also came out clean:


Epilogue
Now you can enjoy safe browsing online with full VPN functionality without having to run malware VPN app 24/7. All your apps are using direct non-tunnelled connection by default, and it's only up to you to decide which one of them should be tunneled (if they support HTTP proxy of course). This functionality is exactly what we discussed in inverse split tunnelling section.
And of course you have my contacts in case you got tilted when configuring this beautiful setup.