Ping utility from scratch with POSIX sockets [C++]: part 2

![Ping utility from scratch with POSIX sockets [C++]: part 2](/content/images/size/w2000/2025/12/ICMP_2.png)
Introduction
In the first part of the saga I attempted to make excuses for reinventing the wheel explain why it might be challenging to ping the whole subnet using a default ping utility, and why it's a good idea to write our own version of the very same thing. This time, finally, we'll get into how ping works inside, what is ICMP protocol and how it's being utilized by ping. And finally, how to implement your own thing based on all this knowledge.
What is ICMP?
We've established that ping sends certain packet (aka ping request) to the designated host and waits for reply. Protocol describing this process is called ICMP:
It is used by network devices <...> to send error messages and operational information indicating success or failure when communicating with another IP address.
There you go: all we need is to send a packet and wait for reply. Should be very easy, right? Wrong. We're using C++ and we're on Linux. That means things have to be complicated and difficult to understand. Which is good for my business because if it was easy I wouldn't have anything to write about.
As of ICMP, all you need to know is that it defines a request packet and a reply packet:

Don't bother with how exactly those packets are constructed or what fields they contain - we'll get back to it later.
Creating ICMP packet in C++
First step in creating our own ping would be to create an ICMP request packet and fill it in with data. And as I mentioned above, things might seem very confusing at first glance. Let's go bit-by-bit to avoid getting tilted.
First of all, include this header in your source file. This will make your life much easier when working with ICMP:
#include <netinet/ip_icmp.h>Creating an ICMP packet is pretty easy:
icmphdr icmp_header = {
    .type = ICMP_ECHO,          // This packet is an echo request (not reply!)
    .code = 0,                  // "Code" has to be zero when sending request
    .checksum = 0,              // ICMP checksum (has to be zero at the start).
};
Now we need to generate an ICMP checksum. This is probably the hardest part to understand. In the snippet above you can see that .checksum field is initialized with zero. Now, in order to generate a checksum, we have to use this same variable (icmp_header) that we just initialized. And strangely enough, it will be assigned to the same .checksum field of the same icmp_header variable (what a brainf**k). So the packet is using itself for generating a checksum, and then assigns that checksum to its own field!
icmp_header.checksum = get_internet_checksum(&icmp_header, sizeof(icmp_header));Now let's find out what kind of dark magic we use in get_internet_checksum method in order to generate a valid ICMP checksum. Don't worry too much about how it works - it's pretty irrelevant for understanding of basic ICMP principles, but I'll show it here just in case:
uint16_t get_internet_checksum(const void *packet, int packet_size)
{
    uint16_t *buffer = (uint16_t *)packet;
    uint32_t sum = 0;
    uint16_t result = 0;

    for (sum = 0; packet_size > 1; packet_size -= 2) {
        sum += *(buffer++);
    }
    if (packet_size == 1) {
        sum += *(uint8_t *)buffer;
    }
    sum = (sum >> 16) + (sum & 0xFFFF);
    sum += (sum >> 16);
    result = ~sum;
    return result;
}
With dark magic out of the way, let's waste no more time and send the goddamn thing to a host.
Creating a socket
Network socket is an endpoint for sending and receiving packets over the network. It's essential part of any network-related software on Linux. There's different libraries providing different socket implementations, but I promised you a POSIX sockets crashcourse. Which is the most popular and well-documented socket library, making it the easiest choice for our pinging utility.
Let's start by creating a socket. Compulsory header files:
 #include <netdb.h>       // required for protoent
 #include <sys/socket.h>  // required for socket

 // error message output
 #include <iostream>
 #include <cstring>
And now the code itself:
// Get the protocol data. In our case it's ICMP, remember?
protoent *protocol = nullptr;
protocol = getprotobyname("ICMP");
if (protocol == nullptr) {
    std::cerr << "Failed to fetch protocol data." << std::endl;
    std::cerr << std::strerror(errno) << std::endl;
    return -1;
}

// Create a socket
int hsocket = socket(AF_INET, SOCK_RAW, protocol->p_proto);
if (hsocket < 0) {
    std::cerr << "Failed to create RAW socket." << std::endl;
    std::cerr << std::strerror(errno) << std::endl;
    return -1;
}
This code creates a RAW socket and configures it to be able to communicate via ICMP. Why raw? Technically you can get away with datagram socket (SOCK_DGRAM flag), but using RAW sockets is a traditional way of utilizing ICMP protocol on Linux, so we'll stick to it.
Sending ICMP request
Enough messing around, let's send the goddamn packet. As always, start with headers:
#include <arpa/inet.h>For the sake of simplicity we'll send our ICMP request to Google DNS address:
// Destination IP address in host order. Has to be a C-string.
auto ip_dest_host_order = std::string("8.8.8.8").c_str();
Now, we can't just use std::string for storing IP address because, surprise-surprise, the standard C methods from POSIX-sockets library developed in 1970-s don't know how to work with relatively modern C++-style strings. Therefore, this IP address needs to be converted to a different presentation before we can use it for network communication (sending ICMP packets in our case).
So what is that presentation that we need? To keep it simple: bytes of data can be arranged in two different ways:
- Host order.
- Network order.
Host order of bytes is the way we store data on our machine. In contrast, network order of bytes is used when data is being transmitted over network. Simple enough? Just grasp easy this concept as I won't go into explanation why it's done like this. For more details - RTFM.
Let's go back to this snippet again:
auto ip_dest_host_order = std::string("8.8.8.8").c_str();We assigned IP address ("8.8.8.8") to a variable, and now it's stored as a string in host order. Before we use it for network communication, we have to convert to a network order. Makes sense, right? Again: stored on host - host order. Transmitted over network - network order.
Things on Linux aren't always simple, so we'll use a special method for this seemingly trivial operation. Pay attention, it takes input as a C-string and writes an output to a structure specifically designed to store IP address in network order:
// Convert IP to network order and store it in a special structure.
struct in_addr ip_dest_network_order;
if (inet_aton(ip_dest_host_order, &ip_dest_network_order) < 0) {
    std::cerr << "Error converting destination IP from host to network order.";
    std::cerr << std::strerror(errno) << std::endl;
    return -1;
}
Spoiler: in_addr type is basically a uint32_t variable, just packed into a structure for better type safety. IPv4 takes up exactly 4 bytes of space which makes uint32_t a perfect candidate for storing it.
Can we send the packet now? NO! Because sendto method, being a a part of libc, can't do things in a user-friendly manner. Just like each boss in a videogame provides its own challenge, every step of sending data over network socket in Linux has its own convoluted quest. So we'll have to fill in another structure which contains our freshly converted IP address and a bunch of useless crap:
const sockaddr_in dest_info = {
    .sin_family = AF_INET,
    .sin_port = htons(0),
    .sin_addr = ip_dest_network_order,
};- AF_INET is a family of protocols that ICMP belongs to.
- Port - we don't use it, make it zero.
- Last field is destination IP address (in network order of course!).
Spoiler: these things actually do make sense and provide a lot of flexibility once you get to use them in network-related software. But they do look like a puzzle when you see it for the first time.
This paragraph has already gotten too long, so let's move to sending an actual packet:
auto rc = sendto(hsocket, (const void *)&icmp_header, sizeof(icmp_header), 0, (const sockaddr *)&dest_info, sizeof(sockaddr));
if (rc < 0) {
    std::cerr << "Failed to send ICMP request." << std::endl;
    std::cerr << std::strerror(errno) << std::endl;
    return -1;
}

std::cout << "ICMP request has been sent to " << ip_dest_host_order << std::endl;
Why do we need to cast dest_info from sockaddr_in to sockaddr? And what is the difference between those two? F**k knows. Ask me something simpler as I'm not specializing on a difficult history of libc. But if you enjoy solving mathematical puzzles, have a look yourself and see if you find any logical explanation.
What did we forget?
return 0;Does it work?
Is this code actually capable of sending an ICMP request? Find out yourself with our simple 12-steps program two steps.
1) Run tcpdump in a separate terminal:
fulltilt-desktop:~$ sudo tcpdump icmpThis will let you capture all the ICMP packets coming from and to your host.
2) Build and run the code you wrote based on code snippets in this article so I don't have to do it for you.
2) Grab a ready-to-run code example (which I wrote for you) from my Github and run it like so:
fulltilt-desktop:~$ make && sudo make install && ./send_receiveSpoiler: why running make install with sudo? It's a long and hard story. We're using RAW sockets in our project. In order to execute a code that utilizes RAW sockets , Linux requires executable (./send_receive in our case) to be run with root priviledges. Of course we want to avoid this due to obvious security risks. So we'll take another route offered by Linux system called 'capabilities'. That way, we can give our executable asuperpowerspecial capability called CAP_NET_RAW which enables it to use RAW sockets in a rootless mode. This will be done automatically once you run 'make install' so you don't have to worry about it. This operation does require privilege elevation, but it's a much better option than doing the same thing to an executable.
If everything goes well, you'll see the following output:
ICMP request has been sent to 8.8.8.8But was it actually sent? Or is my code bullshitting you? Go back to your tcpdump window:
full-tilt-desktop:~$ sudo tcpdump icmp
18:56:34.361773 IP fulltilt-desktop > dns.google: ICMP echo request, id 0, seq 0, length 8
18:56:34.421892 IP dns.google > fulltilt-desktop: ICMP echo reply, id 0, seq 0, length 8
That's the output you should see. Which would indicate (line #1) that ICMP request to dns.google (destination host) has been sent from your machine. Line #2 indicates that your host received reply from dns.google (destination host). Pay attention to how much time has passed from request to reply: 0.06 second.
That's all great. But how do we make our code receive and process that reply? Welcome to next paragraph.
Receiving ICMP reply
Congratulations, you've made it this far. Let's go ahead and find a Holy Grail process an ICMP reply with our DIY ping. Headers first:
#include <vector>Then initialize all the necessary data structures for this astonishingly complex operation:
const auto icmp_reply_expected_size = sizeof(iphdr) + sizeof(icmphdr);
const uint32_t buffer_size = icmp_reply_expected_size + 1;        // has to be bigger than ICMP packet
std::vector<char> buffer(buffer_size);  // vector is easy to use, good choice for receive-buffer
The receiving code is very straightforward:
auto bytes_received = recv(hsocket, buffer.data(), buffer.capacity(), 0);
if (bytes_received < 0) {
    std::cerr << "Error receiving reply from " << ip_dest_host_order << std::endl;
    std::cerr << std::strerror(errno) << std::endl;
    return -1;
}
That will receive data through socket and write it into a buffer. Not an ideal implementation: recv() will block forever if the packet does not arrive, but for now let's pretend it's not an issue.
Now let's find out how to process received data. First let's check how many bytes we got in a buffer and if it's consistent with the size of ICMP reply:
if (bytes_received != icmp_reply_expected_size) {
    std::cerr << "Unsolicited data received." << std::endl;
    return -1;
}
If so - parse it as an ICMP header:
auto reply_icmp_header = (const icmphdr *)(buffer.data() + sizeof(iphdr));Important spoiler: strictly speaking, this is not the best way to receive an ICMP packet. Besides checking the size of packet and parsing the ICMP header we should also parse an IP part of this packet (iphdr structure) to verify that it's actually ICMP that was sent from the right host. Also, it's a good practice to use recvfrom() instead of recv() which will make parsing this data much easier. Plus it doesn't hurt to use non-blocking sockets or recv() with timeout to ensure your code won't get stuck forever if we don't receive the packet. However, for the sake of simplicity, in this article we'll stick to quick and easy solution. You'll get a chance to see how it's done in the actual code a bit later. Or jump to source code on my Github ifyou have ADHDyou're impatient.
In the snippet above: before we cast buffer data to icmphdr, we need to jump over (aka offset) the IP header (iphdr) which comes first in the packet:
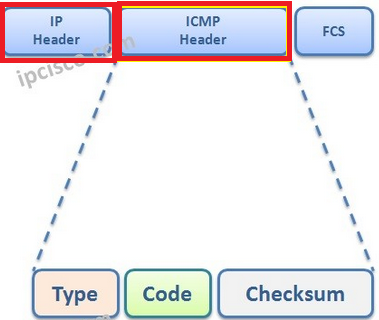
It's a good-to-know detail that will give you more understanding of how packets are travelling across network. IP header -> then ICMP header.
See the picture above says Type? That's exactly what we're checking next:
if (reply_icmp_header->type == 0) {
    std::cout << "Status: [ONLINE]" << std::endl;
} else {
    std::cout << "Status: [OFFLINE / UNREACHABLE]" << std::endl;
}
Basically, zero means destination host has replied to our ICMP request. There's other ICMP types that we have to take into consideration, but for now that's good enough. And my favorite bit:
return 0;Now you can test the godny thing! As a reminder, this example code can be found here. If you run it like we did in a previous section you'll see something similar:
ICMP request has been sent to 8.8.8.8
Status: [ONLINE]
This Google DNS server is online 24/7 making it a relatively reliable option to test your ping. Remember, tcpdump is your best friend which tells you what packets have left or entered your system. So if your program behaves weirdly (blocking forever, for example) or shows OFFLINE when you know for sure it's ONLINE - keep tcpdump open and try again, you might spot something unusual.
Epilogue
Now you possess a sacred knowledge of to write a basic ping utility. In the next chapter we'll look at how to make it work with a whole subnet instead of a single host. I'll also make you familiar with the architecture of my own ping_subnet utility. Get tilted excited!